

How To Install Window Well
How to Install a Terraced Window Well in Your Basement
Updated: Feb. 12, 2020
How to build a series of low walls effectually your basement windows to let in more than light.
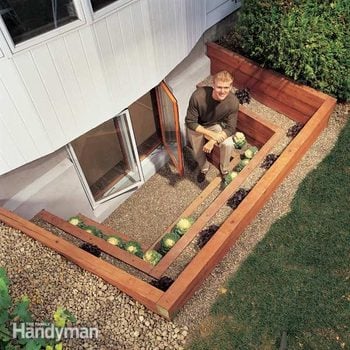
Bring a flood of calorie-free into a dreary basement with a terraced window well. You also become an emergency escape route, planting beds and a view. Build this well as office of an egress window project or simply landscape an existing window well. In this article, we'll walk y'all through the construction procedure and tell yous how to bargain with the all-important consequence of drainage.
You might also like: TBD
- Time
- Complication
- Cost
- Multiple Days
- Intermediate
- $501-m
Pattern for safe
Looking out
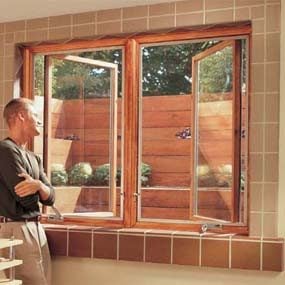
A terraced window well dramatically increases natural lighting in a lower level or basement. These egress windows satisfy Building Lawmaking rules.
The primary rules for designing a window well are the code requirements for an egress window. The bottom of an egress window well must be at to the lowest degree iii x 3 ft., the well can't interfere with opening the window, and you have to provide a permanent ladder if the walls are more than 44 in. high. Terracing our well eliminates the ladder requirement.
Otherwise, you're only limited by rubber and drainage bug. Any window well is inherently dangerous because of the potential for falls. Covered window wells are safest, but you lot can't permit the embrace hinder the window functioning and it must be hands removable (without tools) to provide easy egress and emergency escape.
Terracing minimizes the danger of a fall. Nosotros recommend that yous construct the widest terraces and lowest steps that your site will allow. You could likewise put a railing around the egress window well, a characteristic we recommend if you accept a walk nearby. The egress window well nosotros're edifice opens onto a spacious yard, away from walkways.
Nevertheless, we took the extra precaution of adding a adjourn about eight in. above grade plus flower beds and low bushes to go along folks from stepping into it. Nosotros synthetic our terraced well with 4×vi treated wood timbers because they're long lasting, piece of cake to cut and level, and economical. To dress upwards the timbers, we stained all sides before installation with an oil-based semi-transparent redwood stain.
Decorative physical wall block is another good choice for terracing. This block will last forever, just it's almost twice as expensive as wood and harder to cutting and get together. Another option is to buy a manufactured well. These range from the corrugated steel culvert mode (bachelor in about domicile centers) to manufactured terraced wells.
Skilful drainage is critical
If your basement hasn't suffered any moisture or flooding issues, excavation a window well or expanding an existing well is unlikely to create h2o issues, every bit long as y'all follow the instructions in the photos. The ii sizes of gravel we prove provide a path for water to easily flow downwardly into the soil without filling up the well. The landscape fabric acts as a filter to prevent soil from clogging the gravel drain field.
Soil with a high clay content, nonetheless, poses another trouble. This soil tends to trap h2o instead of letting it drain away. For yards with clay soil or poor drainage, or for damp basements, consult a professional person before undertaking the project. (Check the Yellow Pages under "Waterproofing Contractors.")
One selection to ensure good drainage is to necktie the well'south drain field into the existing drainage system around the footing of your basement (Fig. A). If you don't know if you have foundation drains, you'll accept to call the builder or the city department of inspections, or dig down to the footing at the bottom of the wall and await for a gravel bed with a plastic or other type of pipe. If y'all notice the pipe, simply fill the hole with 3/four-in. gravel to connect the two bleed fields.
Some homes have drains on the interior, under the basement floor, and rely on a sump pump to get rid of h2o. Connecting to this type of system is more complicated and difficult. Nosotros advise that you leave this work to a pro.
Exist certain to bear witness your program to your local building inspector and obtain a let. Enquire most whatever special requirements and talk over drainage problems. The inspector should be familiar with local soil conditions. You can acquire more nigh egress windows here.
Pace ane: Dig and prep the hole

Photo i: Lay out the dimensions and start earthworks
Drive a stake for a center mark and mark an outline for each layer with spray paint. Dig each shelf about 17 in. deep and 12 in. wide (Fig. A). This will get out room for nearly 8 in. of gravel behind the wall. Protect your lawn with a tarp.

Photo 2: Excavate for drainage
Dig out the bottom level 12 in. deeper than the bottom of the rough window opening. Gradient the bottom 1/2 in. per foot away from the foundation. Along the edge of the base farthest from the wall, dig a 12-in. broad x 6-in. deep drainage trench.

Photo 3: Add landscape fabric
Line the entire well with landscape fabric. Use fabric spikes to hold information technology in place and fold it into the corners to get complete coverage. The fabric acts both as a weed barrier and every bit a filter to keep soil from clogging your gravel drainage system.
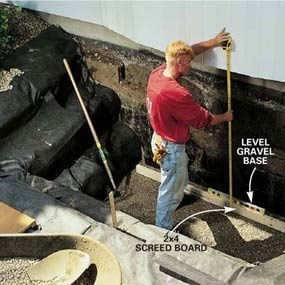
Photograph 4: Level a gravel base
Dump in a layer of iii/4-in. gravel, so add pea gravel until the surface is 6 in. below the rough window opening (Fig. A). Employ a 2×4 to flatten and level the gravel. If yous oasis't cut the opening nevertheless, mark the rough opening clearly and then you don't overfill the hole.
Photos 1-4 walk you lot through the steps for digging the well. Fig. A shows you lot the exact dimensions we used, but you tin easily adjust them to fit your site. Your layout doesn't have to exist precise; a stake centered on the window will exist accurate plenty for digging (Photograph 1).
To build the size well we testify hither, you'll be removing a small-scale mount of clay (more 8 cu. yds.). Save your topsoil, just get rid of the residue of the dirt by renting a 20- or 30-yd. trash container. The oversized container gives y'all a big base so y'all don't take to pile the dirt so high.
Brand sure the trash container has a gate on the dorsum that yous can swing open for the wheelbarrow. Tell the waste company that you'll be loading clay in the container so information technology's aware of the weight involved. If yous have to put the container curbside, you'll probably accept to get a permit from the law section.
We built our entire well first, then added the window. But it's easier to cut in your egress window afterward yous're done with the initial digging (Photo 2). Then cease the well.
TIP: Cover the excavation during rainy periods to keep water out and keep the walls from eroding.
Caution
Before doing any digging, ever call your local utility companies (Natural gas, Water, Electric, Telephone and Cable) to locate buried lines.
Step ii: Fix the beginning row of timbers

Photograph 5: Cut timbers from opposite sides
Cut the 4×half dozen timbers with a round saw set at an xi-caste angle. It will take two passes to complete the cut. Every bit you cut the timbers to length, remember to conform the length to alternating the overlap at the corners.

Photo 6: Utilise preservative to cut ends
Treat the cut ends of the timbers with a wood preservative to stop rot. Then lay the wall timbers according to the plan in Fig. A.

Photograph 7: Level the first row of timbers
Set the outset row of timbers perfectly level on the gravel base. Be fussy. Screw the corners together. Get together the first wall (See Photos 9 and 10) and backfill with gravel. Create a level base of operations for each timber wall with about 6 in. of gravel (no compacting needed). After completing the kickoff wall, utilise the timbers as a guide to level the base of operations for the remaining walls.
With the bottom level and the window accurately marked, lay out your wall pattern. And so measure out the lengths and angles of the timbers and cutting them (Photo 5). Often, the cuts expose untreated wood, so care for raw ends after cut (Photograph 6). Use a wood preservative containing copper (available at paint stores, hardware stores or abode centers). Set the commencement row of timbers perfectly level (Photo vii).
Stride three: Gear up and fasten the remaining levels

Photograph 8: Position the next level
Utilize a framing foursquare to establish the setback from the previous wall (12 in. on the side and 14 in. on the front end). Tie the start course together (2 side pieces and a front) with ii 3-in. screws at the joints. Then tamp the course perfectly level with a hammer.
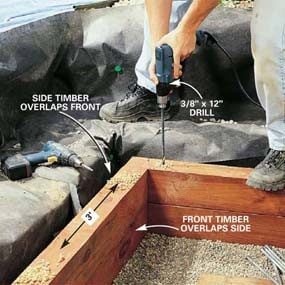
Photo 9: Overlap corners of each row
Gear up the second course in place. Brand sure to alternate the joints and then the timbers overlap at the corners. Screw the second form together at the corners. With a iii/8 x 12-in. drill bit, predrill the timbers for spikes at the ends and nearly every 3 ft.

Photo 10: Drive spikes to ballast the rows
Spike the timber courses together with 3/8 x 10-in. spikes and a 4-lb. hammer.

Photograph 11: Backfill with amass and gravel
Backfill behind the timber walls with 3/4-in. aggregate, capping it with a 3- to 4-in. layer of pea gravel for the next wall. The larger aggregate volition promote drainage.
The process for the second row is exactly the same as for the start (Photos eight – eleven). Driving the spikes takes some attempt, then be sure to predrill with a 12-in. bit (Photo ix). One good reason to backfill with gravel is to avoid the need for compacting (Photo 11). Backfilling with soil would require a lot of tamping to continue it from settling over the side by side year or two. Complete and backfill all the levels.
Step four: Ballast the walls at the foundation

Photo 12: Predrill for concrete anchors
Predrill five/16-in. holes in 1-1/2 in. aluminum bending, concur information technology in place and predrill 3/16-in. holes into the physical with a masonry bit.

Photo thirteen: Drive concrete screws
Apply a dab of caulk to 1/4-in. x 1-1/ii in. concrete screws and drive them home. Exercise not secure the stop to the timber wall. This allows the timbers to move slightly during freeze/thaw cycles.
Photos 12 and xiii show you how to anchor the timbers against the foundation. Once you lot finish the well, scatter decorative stone over the surfaces to spruce up its appearance. If you decide to add plants, confine them to pots nestled into the gravel. That way soil won't clog up the drainage. Or encourage vines to grow over the tiptop and downward the sides. But leave an uncluttered pathway open for emergency escape.
Additional Information
- Figure A: Window well details
- Figure A: Window well dimensions
- Figure A: Wall connection
Required Tools for this Egress Window Well Project
Have the necessary tools for this DIY project lined up before you start—you'll salve fourth dimension and frustration.
Rubber gloves
3/eight-in. drill flake, 12-in. long
v/16-in. masonry bit
Required Materials for this Egress Window Well Project
Avoid last-infinitesimal shopping trips past having all your materials ready ahead of time. Here's a list.
Originally Published: November 28, 2018

How To Install Window Well,
Source: https://www.familyhandyman.com/project/how-to-install-a-terraced-window-well-in-your-basement/
Posted by: tanwhistalcup.blogspot.com
0 Response to "How To Install Window Well"
Post a Comment